Frameless Door Details
Specifications for our Hidden Frame and Hidden Hinges
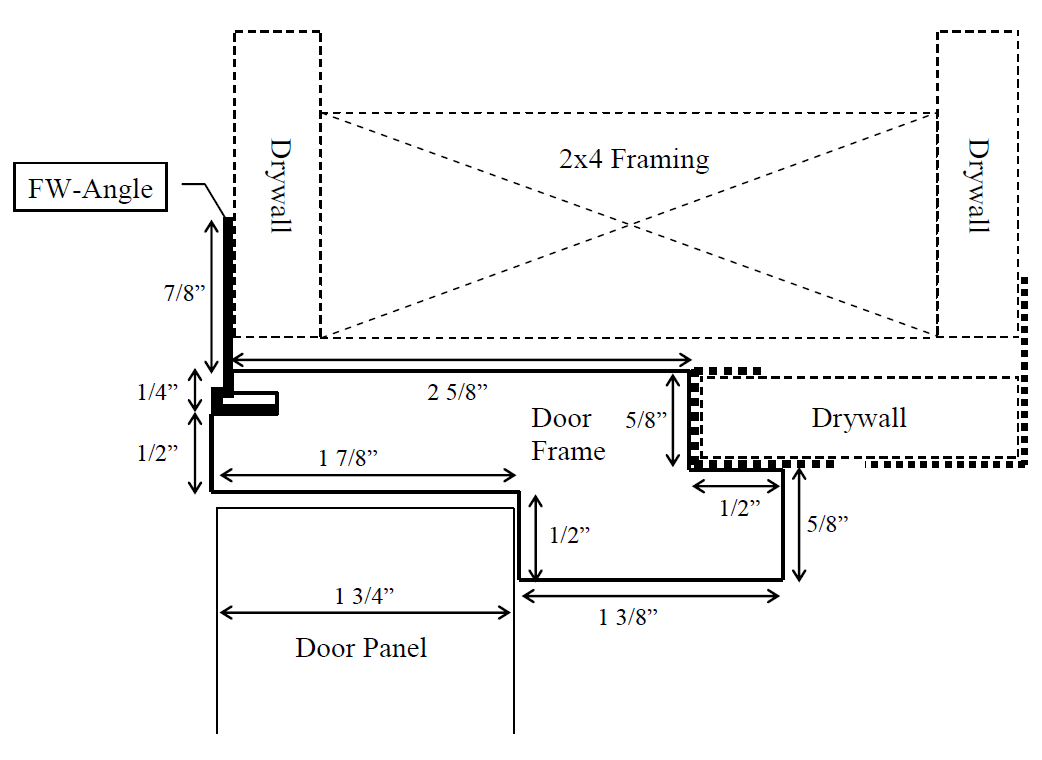
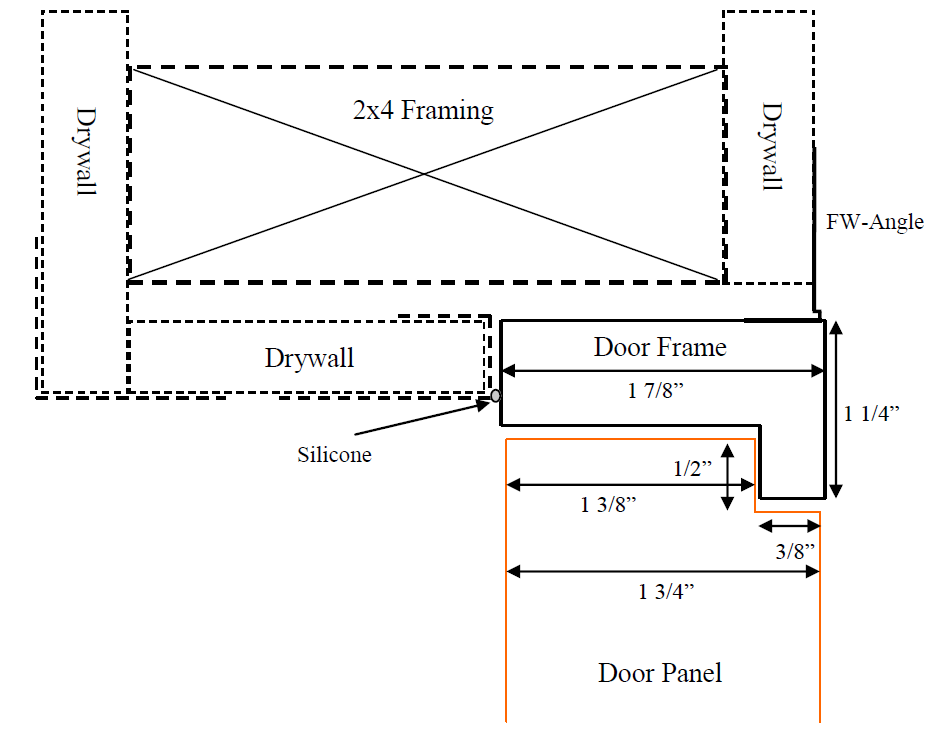
We provide a unique and simple Concealed Door Frame that can be used with any style 1 3/4″ thick door panel (or 1 3/8" if required). It is a versatile design that allows you to install it in a wide variety of door openings with varying wall thicknesses – be it 2×4, 2×6, 2×8 or even wider.
Our focus is too make the installation as simple as possible, so that your builder does not need to do anything out of the ordinary when it comes to framing door openings and installing drywall. We have provided more in-depth details on the make-up of our concealed door frame in the PDFs below. In addition, we can provide recommendations on what products to use during the installation of our door frame.
The Frameless Door Details can be found here:
Swing Directions of our Flush Doors
Hidden Hinge Information
Outswing Concealed Door Frames can be used with 1 3/4″ thick door panels (or 1 3/8" thick doors if required). Inswing Concealed Door Frames always use 1 3/4″ thick door panels. Italian-made OTLAV IN230 Concealed Hinges are our preferred hinge to provide precision and longevity.
Below is a more information on the Hidden Hinges we use on all our doors.
PDF for Download: OTLAV IN230 Hidden Hinges
Installation Recommendations for our Invisible Door Frame
Follow these steps for the installation of our Concealed Door Frames:
- Join the 3 pieces of door frame using Wood Glue or Construction Adhesive on the 45 degree miter joints.
- Apply a 1" wide strip of Construction Adhesive (slow-setting adhesive is recommended) to the perimeter of the drywall on the flush door side.
- Set door frame into opening and shim it plum and level before adhesive sets. The PVC Flange will rest against the drywall and will bond with the adhesive.
- Ideal Screw location is above and below each hinge as well as in the vertical centre of the door frame.
- Low Expansion Foam should to be used all around the perimeter of the Door Frame. This will reduce vibrations when the door is opened and closed.
- Drywall return is installed on the non-flush side of the door.
- On the Outswing Version the drywall is inserted into the 1/2″ x 5/8″ rabbet on the door frame’s non-flush side (use of a J-Channel is recommended).
- On the Inswing Version the drywall will "butt up" to the door frame on the non-flush side (caulking at the joint is recommended).
- Wall, Flange and Door Frame are feathered in with drywall mud (12" feathering width is recommended)
- After the mud has dried, the door panel can be installed. Hinges can be adjusted for proper door-to-frame perimeter gaps.
- Walls, Concealed Door Frame and Flush Door Panel can now be painted.
New Product:
We now also offer Tilt and Turn Windows and Doors for Canada and the USA. We focus but are not limited to Tilt and Turn Windows Kelowna and Tilt and Turn Windows Calgary, as well as Tilt and Turn Windows Edmonton and Tilt and Turn Windows Seattle.
More Tilt and Turn Window Information can be found here: Tilt and Turn Window Security and Tilt and Turn Window Technology Canada


